

|
|
Puff-Puff and Beans: The Quintessential Achombo Experience |
Discover the Irresistible World of Puff-Puff and Beans: Your Ultimate Achombo Recipe Guide
Welcome, food enthusiasts! Today, we’re diving into the heart of West African cuisine with one of my all-time favorite and most comforting dishes: Puff-Puff and Beans. Known affectionately as “Achombo” in Cameroon, and “Beignets Haricots” among Francophone communities, this iconic pairing offers a delightful blend of sweet, spongy fried dough and rich, savory stewed beans. It’s more than just a meal; it’s a cultural experience, a memory-maker, and a true taste of home for many.
From bustling street corners to family dinner tables, Achombo holds a special place in the hearts of West Africans. Its widespread popularity stems from its delicious flavor, satisfying nature, and remarkable affordability. Whether you’re a seasoned chef or a beginner in the kitchen, this comprehensive guide will walk you through every step to recreate this beloved dish, bringing the vibrant flavors of Africa right into your home.
The Enduring Charm of Achombo: A Culinary Journey Through West Africa
My own journey with Achombo traces back to my university days, where it wasn’t just food, but a lifeline. A few coins were all it took to make a trip to one of the renowned “Achombo houses” – humble establishments where students, professors, and locals alike gathered to savor this goodness. The air would buzz with a symphony of orders: “Mami, put me puff-puff for 200 (CFA Francs),” “…add me extra pepper,” “…a little more oil, please,” or the classic student combo, “Puff-puff for 100 and beans for 50!” This simple, economical order, as a wise friend once taught me, was the secret to a satisfying and budget-friendly meal, and she was absolutely right.
These dedicated “Mami Achombos” – the resilient women who masterfully prepare and sell puff-puff and beans – have built their livelihoods on this dish for decades. Their craft not only sustains their families but also feeds countless communities, testament to the dish’s undeniable appeal. People simply can’t get enough of it, a clear sign of its profound impact and irresistible taste.

Childhood memories also intertwine with Achombo. Some of the most cherished days were those when a pot of beans simmered on the stove, but without an accompaniment. A little convincing would secure funds from our parents, sending my younger brother sprinting to the nearest puff-puff joint. He’d return, often breathless, with a bag full of warm, golden spheres of deliciousness. Those dinners, simple yet profound, remain etched in my mind as some of the most memorable.
There’s a reason why people continue to flock to this delightful combination. The marriage of sweet, fluffy puff-puff with hearty, savory beans is, quite simply, the truth! And the best part? Puff-puff is surprisingly easy to make with just a few staple ingredients. You no longer need to rely on the Mami Puff-puff around the corner or fret if she skips a day. With this recipe, you can bring the authentic taste of Achombo directly into your own kitchen, whenever the craving strikes!
What is Puff-Puff? A Sweet & Spongy Delight
At its core, Puff-Puff is a popular West African snack made from a simple yeast-based dough, deep-fried until golden brown and perfectly puffy. It boasts a light, airy, and slightly chewy texture with a subtle sweetness, making it incredibly addictive. Often likened to a doughnut hole but with its own distinct character, puff-puff is a versatile treat, enjoyable on its own or, as we’re exploring today, paired with a savory accompaniment.
The Perfect Pairing: Flavorful Savory Beans
While delicious on its own, puff-puff truly shines when served alongside a bowl of flavorful, stewed beans. These aren’t just any beans; they’re typically cooked down with a vibrant blend of onions, garlic, ginger, and other aromatic spices, creating a rich, hearty, and sometimes subtly spicy stew. The savory depth of the beans beautifully balances the sweetness of the puff-puff, creating a wholesome and incredibly satisfying meal that’s both comforting and invigorating.
The Ultimate Puff-Puff Recipe: Sweet, Spongy, and Simply Delicious
Get ready to create some magic in your kitchen. This recipe yields perfectly light and fluffy puff-puff every time.
Preparation & Cooking At a Glance
- Preparation time: 80 minutes (includes proofing time)
- Cooking time: 30 minutes
- Total Time: 1 hour 50 minutes
- Serves: 4-6 people
Essential Ingredients for Puff-Puff
Gather these simple ingredients for your delicious puff-puff:
- 2 cups (approximately 250g) all-purpose flour
- 1 teaspoon active dry yeast
- ½ cup (approximately 100g) granulated sugar (adjust to your sweetness preference)
- ½ teaspoon salt
- 1 ½ cups WARM water (around 105-115°F / 40-46°C – crucial for yeast activation)
- 1 litre vegetable oil for deep frying (or enough to submerge the puff-puff)
Step-by-Step Guide to Fluffy Puff-Puff
- Activate the Yeast: In a small bowl, combine about ¼ cup of the warm water with the teaspoon of active dry yeast. Stir gently and let it sit for 5-10 minutes. This allows the yeast to “bloom,” indicating it’s active and ready to work. You should see a foamy layer form on top.
- Combine Dry Ingredients: In a large mixing bowl, whisk together the flour, sugar, and salt.
- Mix the Dough: Pour the activated yeast mixture and the remaining warm water into the bowl with the dry ingredients. Using your clean hands (the traditional and best method!) or a sturdy spatula, mix everything together thoroughly. Continue mixing until you have a smooth, lump-free batter.

- Achieving the Right Consistency: The batter should neither be too thick nor too runny. It should be thick enough to hold a good quantity in your hand without immediately dripping through your fingers, yet still pourable. If it’s too thick, add a tiny bit more warm water; if too thin, a tablespoon of flour.
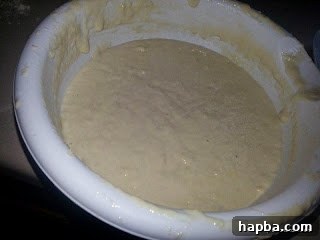
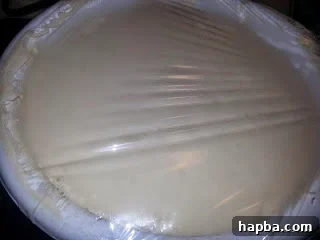
- Proof the Dough: Cover the bowl tightly with plastic wrap or foil paper. Plastic wrap is often preferred as it helps to retain warmth and moisture more effectively, creating a perfect environment for the dough to rise.
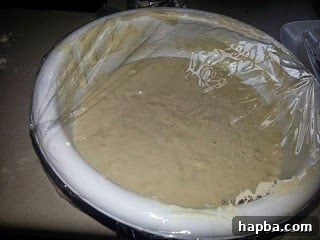
- Allow to Rise: Place the covered bowl in a warm place, free from drafts, for about one hour (or until doubled in size). A slightly warmed oven (turned off, just warm) or a sunny spot works wonders. After the hour, your mixture should have noticeably increased in volume and appear light and airy.
- Heat the Oil: Pour the vegetable oil into a deep, heavy-bottomed pot or Dutch oven. Heat the oil on medium heat, slightly above medium. It’s crucial to avoid overly hot oil, as this will burn the puff-puff exterior before the inside has a chance to cook through. The ideal temperature is around 350-375°F (175-190°C).
- Test Fry: To ensure your oil is at the right temperature, drop a small dollop of dough into the hot oil. If it immediately sizzles and slowly floats to the top, it’s ready. If it sinks and takes too long to surface, the oil isn’t hot enough. If it browns too quickly, the oil is too hot; reduce the heat.
- Fry the Puff-Puff: Once the oil is ready, carefully drop spoonfuls of the dough into the hot oil. You can use your hands (a traditional method, but be cautious!), a regular tablespoon, or even an ice cream scoop for uniform sizes. Avoid crowding the pan; fry in batches to maintain oil temperature and ensure even cooking.
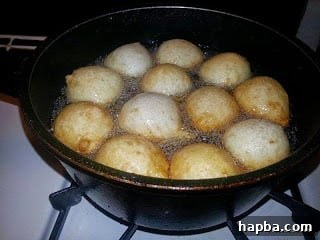
- Flip and Cook Evenly: As one side turns golden brown, use a slotted spoon or tongs to gently flip the puff-puff to the other side. Allow it to cook until it’s evenly golden brown on all sides and cooked through.

- Drain Excess Oil: Once perfectly golden, remove the puff-puff from the oil and place them on a plate lined with paper towels. This will help absorb any excess oil, ensuring they remain deliciously crisp and less greasy.
- Cool and Enjoy: Resist the urge to bite into them immediately – they will be piping hot! Give them a minute or two to cool down slightly. Then, get ready to munch on these warm, fluffy delights!

Crafting the Perfect Savory Beans to Accompany Your Puff-Puff
While the puff-puff is frying, you can prepare your savory beans. This quick and easy method ensures a delicious, flavorful accompaniment.
Ingredients for the Savory Beans
- 2 cups dried black-eyed peas or kidney beans (or 2 cans, drained and rinsed)
- 1 medium onion, chopped
- 2 cloves garlic, minced or blended
- 1 inch ginger, grated or blended
- Small bunch of celery, chopped or blended
- Small bunch of fresh parsley, chopped or blended
- 2-3 tablespoons vegetable oil
- 1-2 Maggi cubes (or your preferred bouillon cube)
- Salt to taste
- Optional: a pinch of cayenne pepper for a kick, or a smoked fish/meat for added depth
Step-by-Step Guide to Delicious Stewed Beans
- Cook the Beans: If using dried beans, rinse them thoroughly. You can choose to presoak them overnight to reduce cooking time, but it’s not strictly necessary. Boil the dried beans in plenty of water for about 1.5 to 2 hours, or until they are tender. Towards the end of the cooking time (about 15-20 minutes before they’re fully tender), add some salt to the water so the beans can absorb the seasoning. If using canned beans, simply drain and rinse them well.
- Prepare the Aromatics: While the beans are cooking, prepare your aromatics. In a separate pan, heat 2-3 tablespoons of vegetable oil over medium heat. Add the chopped onions and sauté until softened and translucent, about 3-5 minutes.
- Build the Flavor Base: Add the blended garlic, ginger, celery, and parsley (or finely chopped, if you prefer). Fry for another 2-3 minutes until fragrant. Be careful not to burn the garlic.
- Combine and Season: Drain the cooked beans (reserving a little of the cooking liquid if you want to control thickness). Add the beans to the pan with the sautéed aromatics. Crumble in the Maggi cube(s) and add salt to taste. If using, now is the time to add a pinch of cayenne pepper or your optional smoked fish/meat.
- Simmer and Serve: Stir-fry the beans with the aromatics and seasonings for about 5-7 minutes, allowing all the flavors to meld beautifully. If the mixture is too dry, add a splash of the reserved bean cooking liquid or water. Serve warm with your freshly made puff-puff.
Expert Tips for Your Achombo Masterpiece
- Dough Rising Aid: If your dough seems hesitant to rise, a lightly warmed oven (ensure it’s turned OFF!) can be your best friend. The gentle residual heat provides the perfect environment. I use this trick often!
- The “Ajebutter” Version: For an extra rich and slightly creamier puff-puff (sometimes called the “ajebutter” or ‘rich kid’ version playfully), add 1-2 tablespoons of dry milk powder to your dry ingredients. It adds a delightful depth of flavor.
- Oil Temperature is King: Maintaining the correct oil temperature is paramount. Too cold, and your puff-puff will absorb too much oil, becoming greasy. Too hot, and they’ll burn on the outside while remaining raw inside. A good way to gauge is to use a cooking thermometer or rely on the test-fry method.
- Flour Type: While all-purpose flour works perfectly, some prefer bread flour for a chewier texture or a mix of both. Experiment to find your favorite!
- Bean Flavor Enhancements: For an even richer bean stew, consider adding a touch of smoked paprika, a bay leaf during cooking, or a small piece of smoked turkey or fish for an authentic West African flavor profile.
- Don’t Overcrowd the Pan: Fry puff-puff in small batches to prevent the oil temperature from dropping too drastically, ensuring consistent browning and cooking.
Serving Suggestions & Enjoyment
Puff-Puff and Beans is best enjoyed warm, immediately after preparation. The contrast between the fluffy, sweet dough and the savory, spiced beans is truly sublime. Serve them simply on a plate, perhaps with a side of extra chili sauce or a fresh tomato and onion relish for an added kick. It’s a satisfying meal for breakfast, lunch, or even a hearty snack.
Frequently Asked Questions (FAQ) About Puff-Puff and Beans
Q: What’s the difference between puff-puff and doughnuts?
While both are deep-fried dough, puff-puff is typically made with a simpler, less enriched dough than most Western doughnuts. It’s usually spherical, without a hole, and has a unique spongy texture and a slightly less sweet profile. The flavor profile is distinct, often associated with its unique yeast fermentation and frying technique.
Q: Can I make puff-puff dough ahead of time?
Yes, you can! After the initial rise, you can punch down the dough gently and refrigerate it in an airtight container for up to 24 hours. When you’re ready to fry, take it out of the fridge and let it come to room temperature for about 30-60 minutes, allowing it to rise slightly again before frying. This is great for meal prepping!
Q: How do I store leftover puff-puff and beans?
Store leftover puff-puff in an airtight container at room temperature for up to 2 days, or in the refrigerator for up to 4 days. Reheat gently in a microwave or oven. The beans can be stored separately in an airtight container in the refrigerator for up to 4-5 days. Reheat the beans on the stovetop or in the microwave.
Q: What if my puff-puff doesn’t rise?
The most common reasons for dough not rising are inactive yeast, cold water (which kills yeast), or a cold environment for proofing. Ensure your yeast is fresh and your water is warm (not hot!). If it’s a cold day, try placing the bowl in a slightly warmed, turned-off oven or near a warm spot in your kitchen.
Conclusion: Your Achombo Awaits!
There you have it – a complete guide to preparing an authentic and utterly delicious batch of Puff-Puff and Beans. This dish isn’t just about satisfying hunger; it’s about connecting with a rich culinary heritage, creating cherished memories, and enjoying a truly unique flavor combination. So, roll up your sleeves, gather your ingredients, and embark on this delightful cooking adventure.
Don’t forget to share your culinary creations with me! I’d love to hear about your experience and see your homemade Achombo. Happy cooking, and much love and hugs from my kitchen to yours!