
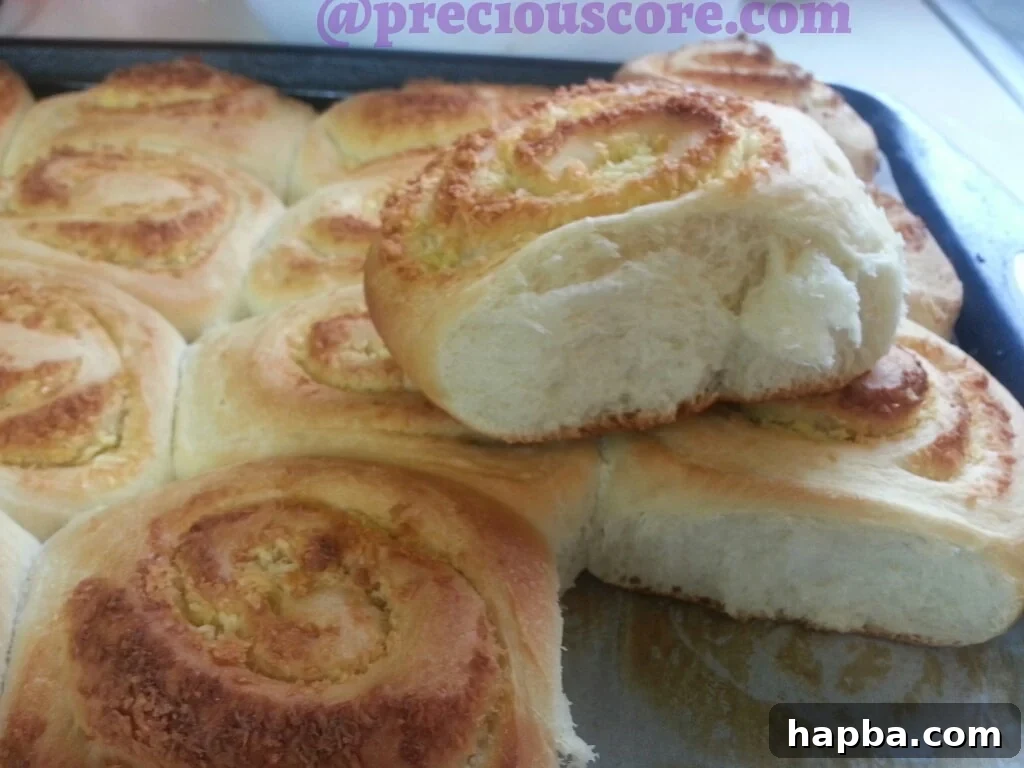
Irresistibly Fluffy Homemade Coconut Rolls: Your Guide to Tropical Baking Bliss
For those who harbor an undeniable love for all things coconut, prepare to embark on a culinary adventure that will transform your kitchen into a fragrant tropical haven! If you’re a regular reader of this blog, you’ll know my adoration for the exquisite flavor of coconut in food knows no bounds. This passion is evident in delightful recipes such as the Cameroon-style coconut pancakes and my beloved fried coconut rice, all designed to infuse your meals with that unique, comforting ‘coconuty’ ambiance. Today, we’re taking that obsession to new heights with these incredibly soft, flavorful, and utterly addictive coconut rolls.
The concept of these Homemade Coconut Rolls descended upon me like a divine revelation. With a well-stocked pantry and an eager heart, I immediately set out to bring this vision to life. The result, I’m thrilled to share, is nothing short of baked perfection: light, airy, and bursting with tropical goodness. Every bite is a testament to simple pleasures and the magic that happens when fresh ingredients meet passion. Get ready to fall in love!
Crafting Your Own Coconut Rolls: Simplicity Meets Deliciousness
Don’t let the elegant appearance of these rolls intimidate you. While they might look like they belong in a fancy bakery, I promise you they are surprisingly easy to make. The process does require a little patience and a bit of time for the dough to rise, but every second spent is truly worth it for the incredible aroma and taste that fills your home. The beauty of this recipe lies in its adaptability: whether you have access to fresh coconuts, rich coconut milk, versatile coconut oil, delicate coconut flakes, or even special coconut spreads, you can create these delectable rolls. I’ll even guide you on how to make them with just a single fresh coconut!
For this particular recipe, I’ve incorporated a variety of coconut-infused ingredients to maximize flavor: coconut spread (a wonderful alternative to butter, if you can find it), powdered coconut milk for a concentrated essence, rich coconut powder, and a hint of coconut essence for an extra aromatic kick. I stumbled upon a fantastic coconut spread in a grocery store’s “limited supply” section. If you’re in the United States, you might be lucky enough to find similar specialty items at stores like Aldi. These ingredients elevate the coconut flavor, making each roll an unforgettable experience.
However, as I emphasized earlier, if all you have is a single, fresh coconut, you are still perfectly equipped to create these amazing rolls! Head straight to the “Notes” section at the end of this recipe to discover detailed instructions on how to prepare and utilize your fresh coconut to yield both the milk for the dough and the shredded coconut for the rich filling. It’s simpler than you might think!
The dough used in this recipe is remarkably similar to the one featured in my popular Cameroon Gateau recipe, highlighting its incredible versatility for various baked goods. For these rolls, I’ve crafted a truly irresistible filling: a harmonious blend of finely desiccated (dry) coconut, silky confectioner’s (icing) sugar, and just enough egg to bind it all into a moist, luscious mixture. Just imagine that heavenly combination, ready to burst forth from a warm, tender roll!
Are you ready? Let’s embark on this truly ‘coconuty’ adventure together and fill your kitchen with the sweet scent of freshly baked bliss.
COCONUT ROLLS RECIPE
Prep time: 90 mins (includes rising time)
Cook time: 20 mins
Total time: 1 hr 50 mins
Yields: Approximately 20 delicious rolls
You’ll Need:
For the Dough:
- 3 1/2 cups all-purpose flour (plus extra for dusting)
- 5 tablespoons unsalted butter (softened or melted; if you can find coconut spread, use it for an intensified coconut flavor!)
- 1/2 cup coconut milk (full-fat for richness)
- 2 1/4 teaspoons active dry yeast (or 1 standard sachet, about 7g)
- 1/2 cup warm water (around 105-115°F / 40-46°C for activating yeast)
- 3/4 cup granulated sugar
- 1 large egg (room temperature)
- 1 teaspoon salt
- Optional: 1/2 teaspoon coconut essence (found in Asian markets or baking aisles)
For the Filling:
- 1 cup coconut powder, desiccated coconut, or finely shredded coconut flakes (unsweetened is preferred, adjust sugar if using sweetened)
- 1/4 cup icing (powdered or confectioner’s) sugar (adjust to taste, especially if using sweetened coconut flakes)
- 2 large eggs (beaten)
You’ll also need 1 tablespoon of melted butter (or coconut oil) for brushing the rolls before baking.
Here is What You Need To Do:
-
Activate the Yeast: In a small bowl, combine the warm water and yeast. Stir gently and let it sit for 5-10 minutes until it becomes foamy. This indicates your yeast is active and ready to make your rolls wonderfully fluffy.
-
Prepare the Fat: Gently melt your butter or coconut spread over medium-low heat until it’s fully liquefied. Alternatively, use a microwave for quick melting. Set aside to cool slightly. (I used the coconut spread pictured earlier for a deeper coconut flavor profile).
-
Prepare Coconut Milk: If using powdered coconut milk, mix it with half a cup of warm water according to package instructions to create a rich liquid coconut milk. If using canned coconut milk, simply measure out 1/2 cup.
-
Combine Wet Ingredients: To the activated yeast mixture, add the granulated sugar, salt, the large egg, melted butter/coconut spread, and the prepared coconut milk. Whisk everything together thoroughly until well combined. This forms the flavorful liquid base for your dough.
-
Initial Flour Addition: Pour about half of the all-purpose flour into the wet ingredient mixture. Begin to mix using a whisk or a wooden spoon until a thick, shaggy paste forms. Ensure there are no dry pockets of flour.
-
This initial mixture should resemble a thick, somewhat lumpy paste. This stage is crucial for developing some gluten before the final kneading.
-
Add Remaining Flour & Knead: Set aside your whisk. Pour in the remaining flour and, using your hands, begin to mix and knead the dough directly in the bowl or on a lightly floured surface. Knead for about 8-10 minutes until the dough becomes smooth, elastic, and no longer sticky. It should spring back when lightly poked.
-
Optional Flavor Boost: At this point, I like to drizzle a bit of coconut essence over the dough for an intensified aroma and flavor. This step is completely optional but highly recommended if you want that extra tropical kick. Look for it in the flavor or baking aisle of specialty Asian grocery stores.
-
Form and Rest the Dough: Once fully kneaded, the dough should be a cohesive, soft ball. Transfer it to a lightly greased bowl, turning it once to coat all sides.
-
First Rise (Proofing): Cover the bowl tightly with plastic wrap to prevent drying, and place it in a warm, draft-free spot to rise for one hour, or until it has doubled in size. A great trick is to lightly warm your oven for 2-3 minutes on the lowest setting, turn it off, then place the covered dough inside. This creates an ideal environment for proofing.
-
Prepare the Filling: While your dough is rising, prepare the luscious coconut filling. In a medium bowl, combine your coconut powder (or desiccated/shredded coconut), icing sugar, and the two beaten eggs. Mix everything thoroughly until you have a moist, spreadable mixture. The eggs help bind the coconut and sugar, creating a rich, flavorful paste.
-
Add Eggs to Filling: Add the beaten eggs to the coconut mixture. Note: While I used one egg in the photo, I recommend two eggs for the recipe as it results in a richer, more perfectly moist filling that holds together beautifully within the rolls.
-
Add Icing Sugar to Filling: Incorporate the icing sugar into the bowl. Adjust the amount to your sweetness preference, especially if your coconut flakes are already sweetened.
-
Mix the Filling: Mix all filling ingredients thoroughly until well combined and a vibrant yellow color. This mixture will be incredibly aromatic and delicious.
-
Check on Your Dough: After the hour, your dough should have proudly expanded, having transformed from a “baby” dough into a magnificent “adult” dough, beautifully risen and full of air.
-
Admire the beautiful rise! This fluffy dough is the secret to tender, soft rolls.
-
Prepare Work Surface: Lightly flour your clean working surface to prevent the dough from sticking while you roll it out.
-
Punch Down Dough: Gently punch down the risen dough to release the excess air, then transfer it to your floured work surface. This helps create a finer texture in the final baked product.
-
Roll Out Dough: First, gently flatten the dough with your hands. Then, using a rolling pin, roll it out into a large rectangular shape, aiming for a thickness of about 1/4 inch (0.6 cm). The precise shape isn’t critical, but a rough rectangle or large triangle makes for easier rolling.
-
Spread the Filling: Evenly spread your delightful coconut filling over the entire surface of the rolled-out dough, leaving a small border (about 1/2 inch) along one of the longer edges. This border will help seal the roll.
-
Ensure the filling is spread out to cover most of the surface for maximum flavor in every bite.
-
Roll the Dough: Starting from the longer edge opposite the border you left, tightly roll the dough towards the other end. Aim for a snug roll to prevent gaps.
-
Seal the Roll: Once you reach the end, lightly brush the exposed edge of the dough with a little water. This acts as a glue, ensuring the seam seals properly when you finish rolling, preventing the filling from escaping during baking.
-
Complete the Roll: Finish rolling the dough until it forms a tight, even log. Gently press the seam to fully secure it.
-
Trim Edges: For neat and aesthetically pleasing rolls, trim off the rough ends of the dough log. These pieces can be baked separately as chef’s treats!
-
Initial Cut: Place a sharp knife or a piece of unflavored dental floss directly in the middle of the log and cut it in half. This helps in creating uniform rolls.
-
Slice into Rolls: Take each half and slice it into approximately eight even pieces. To achieve this neatly, repeatedly divide each piece in half until you have 16-20 rolls in total. Aim for rolls about 1 to 1.5 inches thick.
-
Arrange on Baking Tray: Line a baking tray with parchment paper. Carefully place the sliced rolls on the prepared tray, leaving some space between each one to allow for expansion during the second rise and baking.
-
Second Rise: Cover the rolls lightly with plastic wrap or a clean kitchen towel and let them sit in a warm place for another 10-15 minutes. They should puff up slightly, indicating they are ready for baking.
-
Melt Butter for Brushing: While the rolls are undergoing their second rise, melt one tablespoon of butter. If your microwave is unavailable or “bad” like mine, a simple bain-marie (placing a bowl over hot water) works perfectly.
-
Preheat Oven & Brush Rolls: Preheat your oven to 325°F (160°C). Once the rolls have visibly risen after their second proofing, gently brush their tops with the melted butter. This helps them achieve a beautiful golden-brown crust and adds richness.
-
Bake to Golden Perfection: Place the tray in the preheated oven and bake for approximately 20 minutes, or until the rolls are beautifully golden brown on top and cooked through. Keep an eye on them towards the end of the baking time, as oven temperatures can vary.
-
Serve & Enjoy: Remove from the oven and let them cool slightly on a wire rack before serving. These fluffy, sweet coconut rolls are best enjoyed warm, perhaps with a cup of tea or coffee. Enjoy your homemade tropical treat!
For added insulation and warmth, I sometimes place a clean kitchen towel over the plastic wrap. This helps maintain a consistent temperature for optimal rising.
Notes for Success & Variations
Using a Whole Fresh Coconut: If you’re fortunate enough to have a whole coconut, the experience is even more authentic! First, crack open your coconut and grate the flesh. To make coconut milk for the dough, follow the method outlined in my coconut rice recipe, but use less water to ensure a truly thick and rich coconut milk. This concentrated milk will impart a deeper flavor to your dough. For the shredded coconut needed for the filling, simply spread the remaining grated coconut in a single layer in a cooking pan over very low heat, stirring occasionally, or on a baking sheet in a low oven. Dry it out until it’s slightly toasted and fragrant. This easy process allows you to enjoy homemade coconut rolls from scratch, maximizing the flavor of fresh coconut.
Tips for Achieving Perfect Coconut Rolls:
- Dough Consistency: The dough should be soft, pliable, and slightly sticky, but not wet. Adjust flour quantity slightly if needed, but avoid adding too much as it can result in dry rolls.
- Warm Environment for Rising: Yeast thrives in warmth. If your kitchen is cool, use the oven trick (warm for 2 mins, turn off, then place dough) or find a sunny spot.
- Don’t Over-knead or Under-knead: Proper kneading develops gluten, which gives the rolls their structure and chew. Too little kneading results in dense rolls; too much can make them tough.
- Even Slicing: For uniform baking, try to slice the rolls into consistent sizes. Using a ruler can help, or eyeball it after the initial cuts.
- Patience is Key: Don’t rush the rising process. Good rolls need time to proof properly, which contributes to their fluffy texture.
Flavor Variations and Customizations:
- Spiced Coconut Rolls: Add a pinch of cinnamon, nutmeg, or cardamom to the dough or filling for a warm, spiced twist.
- Citrus Zest: Incorporate orange or lime zest into the filling for a bright, refreshing contrast to the rich coconut.
- Sweetness Adjustment: Feel free to adjust the amount of sugar in both the dough and the filling to suit your personal preference.
- Glaze Option: For an extra touch of sweetness and shine, you can make a simple glaze with powdered sugar and a touch of coconut milk or water to drizzle over the warm rolls.
Serving Suggestions & Storage:
- Best Served Warm: These coconut rolls are absolutely divine fresh out of the oven, or gently rewarmed.
- Pairings: Enjoy them as a delightful breakfast pastry, a light snack with tea or coffee, or even as a simple dessert.
- Storage: Store leftover rolls in an airtight container at room temperature for up to 2-3 days. For longer storage, freeze them (un-glazed) for up to 1 month. Thaw at room temperature and warm gently in the oven before serving.
Why You’ll Love This Recipe:
These homemade coconut rolls are more than just a baked good; they’re an experience. They fill your home with an intoxicating aroma, bring joy with their soft, pillowy texture, and deliver a burst of tropical flavor that transports you with every bite. The satisfaction of baking them from scratch is immense, and the results are truly rewarding. Whether you’re a seasoned baker or new to working with yeast, this recipe is designed to be approachable and yield consistently delicious results. So gather your ingredients, follow these simple steps, and get ready to enjoy the most delightful coconut rolls you’ve ever tasted!